Making My Brand
Creating my brand was about finding that balance, staying true to my colorful, fun self while keeping things professional. I'm not afraid to take design risks, but every choice I make, whether it's color, texture, or typeface, has a purpose. I wanted my brand to reflect that approach. On this page, you'll see how I brought it all together, step by step.

Step 1: Laying the Groundwork
To begin developing my brand, I created a word map to explore all the directions my identity could take. I gave myself a 30-minute timer and wrote down everything that came to mind, which helped me spot common themes and keep the process focused.
From there, I reviewed my map and pulled out the words that resonated most with me. I narrowed them down to five, and those became the foundation of my brand’s identity:
Bright Bold Geometric
Funky High Contrast
Step 2: Finding a Visual Direction
With my key words in hand, the next step was research. I wanted to see how other designers had interpreted these ideas and explore different visual styles that aligned with them. As I dug in, I found myself drawn to Bauhaus and mid-century modern design. It had everything I was looking for—bold geometric shapes, bright colors, and plenty of high-contrast, funky elements.
Here you can see some of my key inspirations:


Creativity
Imagination
Luck
Originality
Positivity
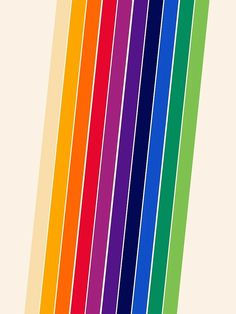
Step 3: Exploring Color with a Purpose
Because this is my personal brand, I decided to start my palette with my favorite shade of pink, a bold raspberry shade, and go from there. From that anchor, I built a set of colors that felt harmonious but still a little funky, calling back to the playful energy I identified in my word map.
Every color I chose is backed by research and psychology. Pink represents creativity, orange reflects originality and the freedom to approach ideas with enthusiasm, yellow brings curiosity along with positivity, fun, and joy, purple highlights imagination and fantasy, and green symbolizes luck, prosperity, and loyalty. These aren’t just traits I want in my brand, they’re qualities I bring to every project, and traits I believe every strong designer should embody. I also knew that five bright colors on their own could feel visually overstimulating, so I balanced them with a clean, minimal brand system. By keeping patterns, shapes, and other extras to a minimum, the colors are free to speak for themselves. It’s a lot, but it works because every other element is intentionally simple.
Beyond symbolism and restraint, I also made sure the palette works practically: it has strong contrast for accessibility, adapts across digital and print, and stays flexible for a wide range of applications. The result is a palette that feels playful and energetic, but also approachable and grounded — the same way I want people to feel when they interact with my work.
Step 4: Making the Mark
With my color palette set, I started sketching out geometric logo ideas using my initials, J and N. Pretty quickly, I landed on a direction that just felt right: bold, clean, and true to the vibe I wanted my brand to have. I played around with a couple of other ideas just to see if something else would stick, but I kept coming back to that first sketch. At that point, I stopped trying to force new versions and focused on the one that felt the most authentic.


Once I decided on what logo I liked, the hardest part was deciding on the colors. I knew pink had to be in there, but I liked almost every combination I tried. I kept going back and forth on whether to stick with two colors or use three. Two would’ve made the “J” stand out more, but three just felt more fun and true to my style. Since it wasn’t that important to me for the J and N to be immediately obvious, I let myself lean into what felt right.
In the end, I went back to my color research and chose yellow, orange, and pink — positivity, originality, and creativity. Those words don’t just describe my brand, they’re also how I try to approach design: vibrant, intentional, and fun. One small detail I like is the intentional gap in the solid-color version of the logo versus no gap in the colored version. Even though I don’t really use the solid mark, that little contrast felt like a fun way to play with structure versus energy. I hadn't decided on that detail at this point in my work, but you'll see it in the finalized versions of my logo later on.
Step 5: Finding the Right Type
I looked at a bunch of funky and geometric fonts, but none of them felt right for the direction I wanted. Since colorful minimalism is the goal, I needed something that would be legible, accessible, and not distracting. In the end, I went with the tried and true Futura, one of my favorite typefaces (next to Gotham).
Futura works because it’s understated but still has personality as well as versatility, and the simplicity of its letterforms matches the simplicity of the shapes in my logo. It’s also widely available, which makes it easy to keep my brand consistent no matter where it shows up. For me, it strikes the right balance between clarity, personality, and usability.


Step 6: Bringing It All Together
Every step of my process, from mapping out words to finding inspiration to defining color, shape, and type, was about making intentional choices that reflect both my brand and my personality. The result is a visual identity that is vibrant and a little funky, with a clean simplicity that makes space for the color and personality to stand out.
For me, design is not just about what looks good. It is about creating work that has meaning and feels authentic. This brand represents not only the way I see design, but also the way I want people to feel when they experience my work: clear, bold, and fun.